Archive for the ‘ General ’ Category

LOD – The Conversation Continues

I recently had a conversation with an Autodesk BIM PRoduct Manager about BIM and they expressed a desire to have the industry define the Level of Detail (LOD) that goes into a model by the specific trades. He expressed that who does what, when and to what level is still not fully defined as an industry standard.

This conversation has been going on for some time.

He said he thought it might come down to a level of trust. That disciplines will not or cannot trust the data in a model provided by others. I share that concern.

Is it time to start trusting out design partners? or is it that each discipline defines the model data at a level the serves their purpose. Is this just the same grand argument that has haunted CAD forever… that each discipline put into the design files/model what they need to have included to get their job done. They are not going to do other disciplines/firms work.

This has been evident in CAD for a long time. No one wants to add a line or layer to make another persons job easier. They will do when pushed, but not without it defined somewhere in a standard or project guideline.

Can we get past this? Can each discipline understand at the uber collaboration level that they are all in it together. Some firms do this, but not all. Let’s keep the design flow in tact and continue to seek the grand vision of BIM – one model from design inception to construction completion and on to owner/operator use.

Revit Options 2010 – Rendering Tab

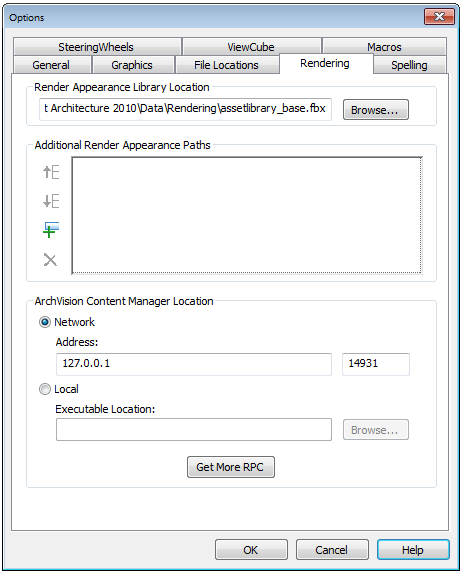
Click the Rendering tab of the Options dialog to specify paths for files used for render appearances and decals, and to specify the location of the ArchVision Content Manager (ACM), if needed.

Render Appearance Library Location

If you move the Render Appearance Library from its default location, use the Rendering tab of the Options dialog to specify its new location.

The Render Appearance Library is a read-only library that stores all render appearances for materials, the default RPC content provided with the software, and related rendering information.

When you install Revit Architecture, this library resides in the following default location:

C:\Program Files\ <product name and version>\Data\Rendering\assetlibrary_base.fbx

If necessary, you can move the Rendering folder but I would not advise that – it just clutters up your install and updates.

Additional Render Appearance Paths

You can specify paths for the following:

  • Image files used to define a custom color, design, texture, or bump map for a render appearance.
  • Image files for decals.
  • Additional RPC content that is stored in a common network location.

Note: You only need to specify paths for additional RPC content that you license directly from ArchVision. You do not need to specify paths for the RPC content that Revit Architecture provides.

Suppose you specify image files for render appearances and decals. When Revit Architecture needs to access the image file, first it looks in the location specified for the file, using the absolute path. If it cannot find the file in that location, Revit Architecture then searches the paths that you specify in this list, in the order in which the paths are listed.

What is RPC?   Revit Architecture includes ArchVision realpeople for more realistic renderings. ArchVision realpeople are pictures of actual people and objects from multiple angles that display using a technique called image-based rendering. They are part of ArchVision’s RPC (Rich Photorealistic Content) product family.

ArchVision Content Manager Location

The bottom portion of this dialog box relates to additional RPC content that you can purchase and use.

Revit Architecture provides many RPC objects that you are licensed to use in rendered images for Revit projects. If you purchase additional RPC content, you must use the ArchVision Content Manager (ACM) to manage it.

Note:  Use the ACM only to manage additional RPC content that you purchase from ArchVision. You do not need to use the ACM for the RPC content that is provided with Revit Architecture.

Click on the Get More RPC toopen up a web page for purchasing or trying out more content…

Revit Options 2010 – File Locations Tab

Click the File Locations tab of the Options dialog to set paths for files and directories.

Files and Directories

Default template file:

Specify the path for the default template file. The Revit Architecture installation automatically sets this path; however, you may want to change it if you need to use either Imperial or Metric units for your project. There are default templates installed in either Revit Architecture\Imperial Templates\ or Revit Architecture\Metric Templates. Select whichever one is appropriate. Also, you can change this path to point to a custom template to use for all your projects.  Just click Browse and pick a new one.

Default path for user files:

Specify the default project path where Revit Architecture saves the current file. This setting overrides the default path for saving files. When you specify a folder, Revit Architecture opens that folder by default when you save or open a file.

Default path for family template files:

Specify the path for the templates and libraries. The Revit Architecture installation automatically sets this path; however, you may want to change it if you need to use either Imperial or Metric families for your project. There are default templates installed in either Revit Architecture\Imperial Library\ or Revit Architecture\Metric Library.

Add secondary libraries that may be specific to your company. To do this, click Places. In the Places dialog, enter the library name, click in the field for Library Path, and click the browse button. Navigate to the appropriate folder, and click OK.

Each of the locations above can be edited to whatever you want.

Click the “+” sign to add you own.  Notice the HMC Library (which was added for my firms files).

You can move search paths up and down as needed with the buttons on the left.

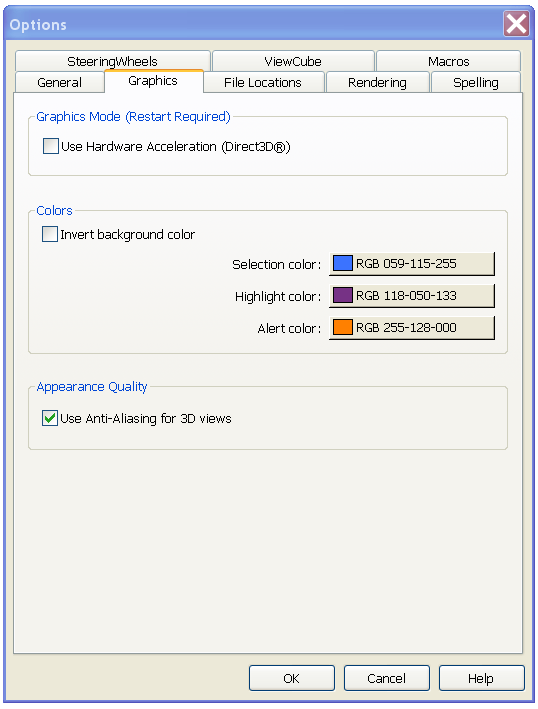
Revit Options 2010 – Graphics Tab

Click the Graphics tab of the Options dialog to enable hardware acceleration for improved display performance. On this tab you can also configure colors for selection, highlighting, and alerts, and enable anti-aliasing for 3D views.

Graphics Mode

Use hardware acceleration. Some of the benefits of using hardware acceleration are:

  • Faster display of large models upon refresh.
  • Switching between windows of views occurs faster with 3D graphics acceleration.
  • Creation and modification of annotations is faster.

Colors

Select Invert background color to change the display of the background of the view and the elements in the view. Click this and apply to see the background change to black from white.
To define a new selection color, click the color button next to Selection Color. This option sets the color for items you select in the drawing area, either by clicking on them or using a pick box.
To define a new highlight color, click the color button next to Highlight Color. This option sets the color of highlighted elements (when you move the cursor over an element in the drawing area).
To define a different error color, click the color button next to Alert Color. This option sets the color for elements that are selected when a warning or error occurs.

Just leave these all as they are.

Appearance Quality

Use Anti-Aliasing for 3D views
When enabled, the quality of lines in 3D views is improved. For example, edges display smoother.

Revit Options 2010 – Opening Notes

You do have some options in Revit and you can set them up  via a dialog box.

Open the dialog box by clicking on the “R” (called the Application Menu)  and going to the bottom right side of the drop down and selecting Options.  Don’t hit Exit.   🙂

This opens the dialog box

It opens on the General Tab.

Once inside the dialog box you can set the following:

General: In this tab you can set notifications, user name, and journal file settings and Display settings.

Graphics: Here you  enable hardware acceleration, configure colors for selection, highlight, background, and alerts, and enable anti-aliasing for 3D views.

File Locations: Specify paths for default file locations and directories.

Rendering : Specify paths for files used for render appearances and decals, and specify the location of the ArchVision Content Manager.

Spelling : Specify options for the spell checker like what to ignore and where dictionaries are located.

SteeringWheels :
Specify options for the SteeringWheels view navigation tools like Look, Walk, Zoom and Orbit tools.

ViewCube :
Specify options for the ViewCube navigation tool like view,snap clicking options and the compass.

Macros: Settings foe Application and Document Macros.

You can set these at any time even when you have no file open.

Revit Options 2010 – General Tab

The General Tab has many settings that affect the way Revit interacts with you.

Notifications

Specify a time value for the Save Reminder interval from the dropdown.

Specify a time value for the Synchronize with Central Reminder interval from a list on the dropdown.

Set the ToolTip Assistance to the desired level. The default is normal. This affects how often tooltips display in the drawing area.

Minimal – Displays only the brief description is provided with limited display of additional information.

Normal – Displays a brief description when you move the cursor over a tool, followed by more information if you hover in place for another moment. This is the default.

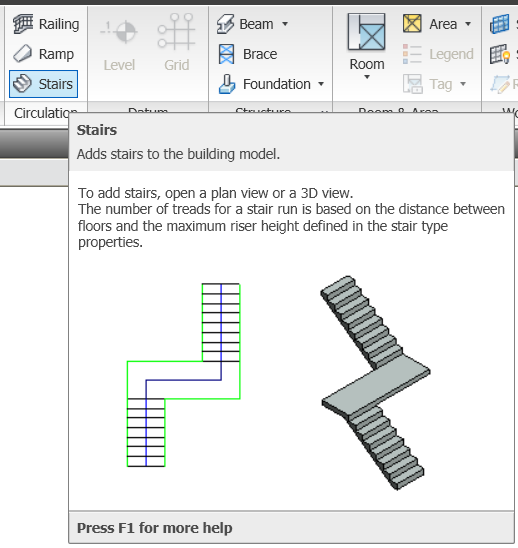
So- as shown below when you hover over the Stair command – it will drop down the full Tooltip shown below.  Hitting the F1 key will open the help file for that specific tool.  Note: if you hit F1 before the tool tip displays it, it will open generic help on the interface and not the tool.
High – Displays the brief description and more information about the tool (if available) at the same time, without a delay.

None- Turns off tooltips so they no longer display. (Power user setting)

Note: When you turn off tooltips, context-sensitive help (F1) is also turned off. If you want context-sensitive help to be available, set Tooltip assistance to Minimal.

Username

Username is the identifier Revit associates with a particular session. The first time Revit is run on a workstation, it uses the Windows login name as the default Username. You can change and save the Username. In subsequent sessions on the same workstation, Revit Architecture defaults to the saved Username, not the Windows login name.  You should most likely leave this as is.

In a multi-user (worksharing) Revit Architecture environment, editing permissions are based on the Username. Two (or more) active local files (or a local file and the central file) should never be edited under the same Username; doing so could cause the local files to be incompatible with the central file.

Journal File Cleanup

Specifies the number of journal files to retain.

Journal Files

Journal files capture the actions taken by the software during a session of Revit Architecture, from the time the software starts to the time it stops.

Revit Architecture creates a new journal file each time you use the software. The journal file with the highest number is the most recent file.  Journal files are text documents that record each step during your Revit Architecture sessions. These files are used primarily in the software support process. Journals can be run in order to detect a problem or recreate lost steps or files. They are saved at the termination of each Revit Architecture session.

Here is an example cut from a Journal file:

‘ 0.000244 2:<<
‘ 1:< System (KB) [Available / Total ] [Revit Memory Usage (KB) —————- ]
‘ 1:< RAM Statistics: 1292676 / 3667864 826184=InUse 828976=Peak 1549004=DeltaForRevit
‘ 1:< VM Statistics: 827876 / 2097024 767092=InUse 769356=Peak 502056=DeltaForRevit
‘ 5.342715 1:<
‘ 1:–API document event DocumentClosing returned DidNotRaise
‘ 1:–API application event DocumentClosing returned status DidNotRaise
‘ 0:< System (KB) [Available / Total ] [Revit Memory Usage (KB) —————- ]
‘ 0:< RAM Statistics: 1283216 / 3667864 826184=InUse 828976=Peak 1558464=DeltaForRevit
‘ 0:< VM Statistics: 827876 / 2097024 767092=InUse 769356=Peak 502056=DeltaForRevit ;oCD;
‘ 0:< CrsTimer event occurred for 37 times in MFCView [Floor Plan: Level 1]
‘ 0:< CrsTimer event occurred for 6 times in MFCView [Elevation: East]
‘ 1:–API application event ViewActivating returned status DidNotRaise
‘H 06-Jan-2010 16:33:28.747; 0:<

As you can see, you don’t usually use these things.  Autodesk may be able to decipher them, but not me.  You can reduce the number or just keep it at 10.

Last is a check box to enable Revit to show the Recent Files page at startup.  The Recent files will still appear on the “R” (Application Menu) dropdown, this just turns off the display thumbnail page of recent files.

Related Posts with Thumbnails